Today I again turn to the work of the talented French artist Stéphanie Valentin. I have previously posted her wonderful lessons on the site. Now she will give some practical tips on how to correctly draw a person’s face. What proportions and distances must be observed to create a realistic drawing. Everything turned out to be very simple!
Picture 1.
Drawing a circle
Draw an egg-shaped oval 
Figure 2.
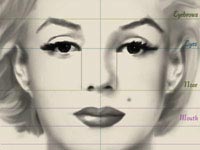
Draw a vertical line in the middle of the oval
Draw a horizontal line in the middle of the oval (Eyes)
Draw the eyes on the horizontal line. Distance between eyes - eye width 
Figure 3.
Draw a “chin line” along the bottom of the oval
Draw a “nose line” along the bottom of the circle
Draw an “eyebrow line”. The distance between the chin and the nose is the same as between the nose and the top of the eyebrows
Draw two vertical lines defining the width of the nose. The distance between the lines is equal to the width of the eye
Draw eyebrows and nose 
Figure 4.
Divide the distance between the nose and chin into 4 equal parts
Draw a mouth between 2 and 3 lines 
Figure 5.
Drawing the face shape
Draw the ears between the “nose line” and the “eye line”
Drawing hair 
Now you have become acquainted with how you can easily and simply draw a decent picture of a person’s face, based only on the simplest shapes and distances. Do you know that this is a whole science, and that if you use precisely adjusted distances, then your work will look harmonious.
By the way, if you want to download one of my premium WordPress templates for free, now you can do it -.
The shape of the head is usually similar to an oval egg, the sharp end of which is directed downwards.
The main elements of the face are located on axes that run exactly in the middle of the widest and longest parts of the oval of the face. Or symmetrically relative to these lines.
To make it more convenient to determine the location of certain parts of the face, you need to enter a measuring unit (a kind of centimeter). It is important that the element taken as a unit of measurement is not too large, but wide enough for constant verification. Usually the width of the eye is used in this capacity.

If you visually divide the oval of the head into five vertical parts, then the width of each of them will be equal to the width of the eye. The eyes are located in the second and fourth parts. Sometimes, due to the structure of the face, parts 2, 3 and 4 may differ in size, but only slightly and quite rarely. Also, the first and fifth parts are narrower than the rest. But most often the illusion is created that they are smaller due to sideburns or long eyelashes and bright makeup, which visually “eat up” the width.

The top edge of the ear is in line with the upper eyelid, and the bottom edge of the ear is in line with the tip of the nose.

Full height open eye from its upper border to its lower border is equal to half its width. The most high point The eyebrows are usually also removed from the highest edge of the eye by half its width. The height of a woman's mouth, as well as the distance from the upper lip to the tip of the nose, is half the size of the eye. The thickness of the upper lip most often occupies one third of the entire height of the mouth.

To build the correct face in compliance with all proportions, you can use the rule of an equilateral triangle. It is as follows: if you connect the outer corners of the eyes (without taking into account the length of the eyelashes) and the lowest point of the central axis of the lips, you should get a triangle whose sides are equal.

The width of the nose, as well as the distance from its upper wing to the eye, is equal to the width of the eye. The lowest point of the chin is one eye width away from the lips. The lower borders of the cheeks are also located at the same distance from the corners of the lips.
It is worth noting that all of the above proportions are typical for a classic ideal face. But depending on nationality, age and gender, all these patterns may vary slightly. There are quite attractive faces in which classical proportions are not observed, but this is rather the exception to the rule.
Irina Khursulova
. Portrait painting is one of the most complex and significant genres visual arts. This is not just a reproduction of the features of a particular person, and understanding it inner world, the essence of his character, the uniqueness of his appearance; the artist’s expression of his attitude towards the depicted. No other genre of painting reveals man so how it does portrait.
How teach your child to draw a portrait correctly? Each teacher has his own methodology drawing a portrait. I teach children first draw a person's face step by step, with a simple pencil.
Using simple rules, draw human Almost everyone can do a face, even child. Perhaps not the first time, but if you really want to, you will definitely be able to teach your child to draw a real portrait of a person.
Before you start working on portrait, it is recommended to prepare everything necessary:
Paper;
A simple pencil.
1. First, draw an oval face with thin lines.
2. For relief drawing exactly in the center draw a vertical line dividing portrait into two parts and two horizontal lines, dividing it by 3 parts: forehead, eyebrows; eyes, nose; mouth, chin.
3. On the top line we draw arc-eyebrows.
4. Below are the eyes. The shape of the eyes consists of arched lines. The iris and pupil are drawn in the middle. Do not forget draw eyelashes, on the upper eyelid they are longer than on the lower.
5. Drawing nose - nose in the middle, beginning at the eyebrows. It is drawn with a smooth arc-shaped line. The crown of the nose is rounded and from the side are drawn wings of the nose and nostrils.
4. The mouth is below the nose. We draw the line of the mouth, on top of the upper lip - two arched lines, on the bottom of the lower lip - a large arched line.
We erase the extra lines with an eraser.
5. Draw ears on the sides at the level of the nose, finishing drawing the shoulders.
6. Then hair: short or long, straight or curly, wavy, with bangs or not, color.
Talent is given to everyone a person by nature, just develop any abilities you need to start with early childhood. By helping children learn to formulate images into images, you, teachers, are doing them a great service. Drawing Using a pencil step by step is not only interesting, but also very useful for young children. Good luck to you!


Publications on the topic:
“I started drawing a gift for my mother, The sun came out and called me for a walk. The sun, the sun, don’t be angry, It’s better to sit next to me. It’s Mom’s holiday.
I bring to your attention the lesson “In the Family Circle: Mother’s Portrait” The purpose of this lesson: to continue acquaintance with the image of a person in.
Master class for parents “We can draw unusual things ourselves.” Goal: to increase the motivation of parents of preschool children to use unconventional techniques drawing in development creativity children,.
Venue: gym. Introduction: Dear educators! We will talk about one sports equipment, which one you will find out by guessing.
Good afternoon, dear colleagues, I want to offer you my master class on the topic “How we draw a portrait.” International Women's Day is coming soon.
Master class “How to draw a picture if you don’t know how to draw” Very often we, music directors and educators have to do it themselves.
How to draw a person's face with a pencil step by step
How to draw a person's face with a pencil
One of the most difficult types of art is the depiction of a person. The physique needs to be studied in detail in parts. We have already looked at some elements.
Before you begin, be sure to read these few tips from professional artists:
First you need to think about the approximate location of all the elements
For sketches, take a sharpened pencil of medium hardness (I used HB and 2B, write in the comments which pencils you used), which will allow you to sketch thin lines.
Do not erase the sketch lines until the desired result is clearly visible.
Maintain proportions
Please note that the face has a pointed shape at the bottom and a more rounded shape at the top.
Practice! The more you practice, the better you will learn to convey the necessary emotions and nuances of human facial expressions.
Now let's move on to the lesson.
How to draw a person's face step by step:
Step one. This girl's face is oval shaped. First, let's make an oval and divide it with lines. Vertical line crosses it exactly in the middle, and the horizontal lines are located as follows. The first divides the face just below half, and the second another half from the remaining lower part of the face. We cannot give exact sizes, since everyone's face is different.
But the task of these lines is to outline the approximate location of the nose (this is the vertical line), as well as the location of the eyes and lips (the horizontal bottom line). Don't forget that you'll have to erase them later, so don't press the stylus too hard on the paper.
If you press hard on the paper, it will become deformed, and the drawing will look like a girl getting ready for plastic surgery. (She will be “beautiful” like a gargoyle)

Step two. Make approximate strokes where the nose will be located. And also add lines for the mouth, and halfway between the nose and chin. Make the line that marks the lower lip wider.

Step three. Let's move on to drawing the eyes. They are located just above the nose. The outer edges of the nose indicate where the inner corners of the eyes will go. Make a sketch as shown in the picture. Consider another important factor here.
Human anatomy is designed in such a way that the distance between the eyes is equal to the size of another eye. This is indicated by a red arrow in the figure.
Now let's add the eyebrows.
Tip: Even if one eyebrow is raised and the eyebrows are the same height, start drawing from the inside (points closer to the nose). To get an idea of how high the eyebrows are, add another dummy eye above the left eye - this should give you more or less the correct height for the eyebrows.

Step 4. Add a mouth. In the previous lesson we already covered some points. For example, we tried to depict the lips of a person. But there's another one important point, there are a lot of questions from aspiring artists about how big the mouth should be? Mentally draw two lines from the inner edges of your eyes down. This will be the approximate size of the mouth; when smiling it may be a little wider.

Step 5. Now we erase the auxiliary lines that we made in the first two steps. Let's see what we got. In principle, the sketch is ready. Now all that remains is to decorate and add shadows.

Step six. Give your face shape more specificity. Pay attention to the cheekbones and the shape of the chin. This woman has a strong chin, but try not to let it get too strong, otherwise she will turn into a man. Sketch in the black pupils and add eyelids.
Drawing eyes requires concentration. This is the mirror of the soul.
A person's face is his mirror. A face can express a person’s character and reflect his qualities as a person. Here we have another lesson on drawing a human face. We already have lessons on how to draw a girl’s face and a mother’s face with a pencil step by step. And here we will teach you how to do this step by step and draw a face young man, guy, man. The principle of drawing is approximately the same in all cases. First, there is an auxiliary stage with the division of a sheet of paper into squares or rectangles, and then the drawing of all parts of the face itself. We will have a face in profile and full face, that is, a front and side view. So let's get started with the lesson!
Stage 1. To carry out this stage, you will need a ruler to draw smooth, clear lines. First we draw three straight lines. One of them runs right in the middle of the sheet, the other two parallel to it above and below. They are crossed by five lines located strictly perpendicular, that is, at right angles. Four lines are shifted to the left, and one to the right. We leave a small clear space between them.

Stage 2. Between the middle and lower straight lines we will place three more (they are shown blue). We draw a circle with a dotted line, limiting it with the same lines as in our drawing.

Stage 3. Let's start tracing the contours of the head in front view and side view. In the front view we are now drawing the hair border line at the top, and in the side view the line at the back of the head.

Stage 4. Now on the left we will draw the line of the chin and cheeks. And on the side - also the jawline.

Stage 5. In the left picture we show the hair growth line in the frontal part with two protrusions and, and draw the ears. On the right side we also show the hairline from the sides and in front.


Stage 7. It's time to shape the eyebrows and nostrils. The eyebrows are wide, the nostrils are slightly widened too.


Stage 9. Between the eyelids, we show the eyeballs with pupils in small circles. Small reflections of light should be reflected in the pupils. At this stage we will also draw small wrinkles under the eyes, on the side of the eyes, on the bridge of the nose and above the line of the mouth.

Step 10. Now we show the rather thick lips that form the line of the mouth. Under the mouth we will outline the chin and a small dimple above it.
